Image to video AI is software that takes a single still photo and generates a short moving clip from it, adding motion, depth, and life to an image that never moved before. Instead of filming a scene, you upload a picture, describe or select the kind of motion you want, and the model predicts how the frames between "frozen" and "alive" should look. The result is a few seconds of video built entirely from one frame. If you have ever stared at a great photo and wished it would breathe, that is exactly the gap this technology closes.
Over the past two years this has gone from a research demo to a tool anyone can use in a browser. You no longer need a camera crew, a green screen, or editing experience. You need one good image and a clear idea of the movement you want. Below, I'll walk through how the technology works, where it shines, where it still struggles, and how to create video with images that actually look intentional rather than glitchy.
What is image to video AI?
An AI image to video generator is a model trained on millions of video clips so it learns how objects, light, hair, water, clothing, and faces tend to move over time. When you feed it a static image, it uses that learned knowledge to invent the next frames in a plausible sequence. The original photo becomes the first frame, and the model fills in everything that follows.
This is different from a simple slideshow or a Ken Burns pan-and-zoom effect. A slideshow moves the camera across a flat image. Artificial intelligence image to video actually generates new pixels: a person can blink, clouds can drift, a coat can ripple in wind that was never there. The motion is synthesized, not faked with a crop.
Two main approaches power most tools today:
Diffusion-based video models that start with noise and refine it into coherent frames, guided by your image and prompt.
Motion-transfer models that apply a learned movement pattern, like a head turn or a smile, onto your subject.
Most consumer products blend these ideas behind a single button so you never have to think about the math.
Diffusion vs. motion-transfer in plain terms
If the technical labels feel abstract, here is a simpler frame. A diffusion video model is like an artist who starts with TV static and slowly sharpens it into a scene that moves, using your photo as the reference for how that scene should begin. A motion-transfer model is more like a puppeteer: it already knows a movement, say, a confident head turn, and it maps that motion onto your subject. Diffusion gives you broad creative range; motion transfer gives you reliable, repeatable movements. Knowing which one a tool leans on helps you predict the kind of results you'll get.
How does AI image to video work, step by step?
Under the hood the pipeline is complex, but the user experience is short. Here is what actually happens when you turn a picture into a clip.
Encoding the image. The model analyzes your photo and breaks it into a representation it understands, depth, edges, subjects, and background layers.
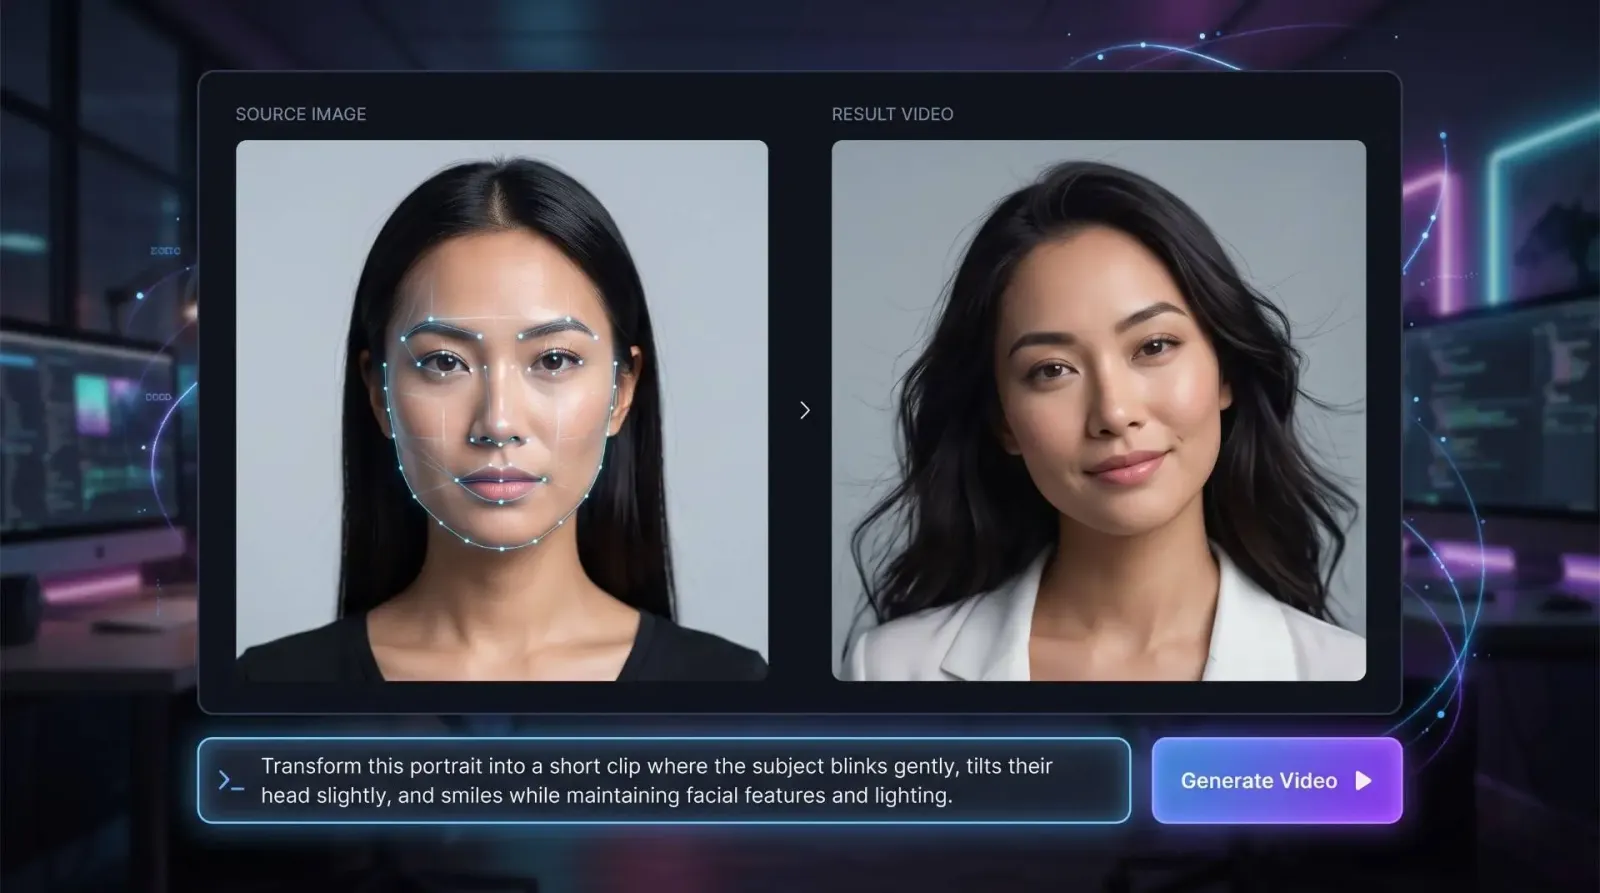
Reading your intent. If you add a text prompt ("slow zoom in, gentle wind, cinematic"), that guides the direction and intensity of motion. Some tools also offer preset motion styles.
Predicting frames. The model generates a sequence of frames, keeping your subject consistent while introducing movement frame to frame.
Smoothing and rendering. Frames are interpolated and cleaned so the motion looks fluid rather than choppy, then exported as a video file.
The whole thing usually takes anywhere from a few seconds to a couple of minutes depending on clip length, resolution, and how busy the platform is.
Why use an image to video generator?
The honest answer is leverage. One asset you already own, a photo, becomes a format that performs far better on modern platforms. Short video outperforms static images on nearly every social feed, and an image to video generator lets you produce that motion without reshoots.
Speed and cost
Traditional video means scheduling, shooting, and editing. Turning an existing image into a clip collapses that into a single upload. For a small business or solo creator, that difference is the gap between posting daily and posting monthly.
Bringing archives back to life
Old product shots, portraits, illustrations, and even historical photos can be animated. A real-estate photo can get a slow push-in. A portrait can gain a subtle blink and head tilt. A flat product render can rotate.
Consistency across a campaign
Because you start from your own images, the look stays on-brand. You are adding motion to assets you already approved, not generating something unrecognizable.
How to create video with images: a practical workflow
Good results are less about the tool and more about the input. Here is the approach I use to get clean, usable clips on the first or second try.
Start with a high-quality image. Sharp focus, good lighting, and a clear subject give the model more to work with. Blurry or cluttered photos produce blurry, unstable motion.
Pick one dominant motion. "Slow zoom" or "hair moving in wind" beats asking for ten things at once. Subtle motion almost always looks more believable than dramatic motion.
Write a specific prompt. Name the camera move, the speed, and the mood. Vague prompts get vague results.
Keep clips short. Three to five seconds is the sweet spot. Longer clips give the model more chances to drift and distort.
Generate, review, refine. Treat the first output as a draft. Adjust the prompt, lower the motion strength, or swap the source image if faces or hands warp.
If you want to try this on your own photos, MagicShot's image to video generator handles the encoding, motion, and rendering in one place so you can focus on the creative call rather than the settings.
Prompting like a director, not a search engine
The biggest jump in quality comes from how you write prompts. Beginners type a noun and hope. Better results come from describing a shot the way a director briefs a camera operator: state the move, the speed, the focal feel, and the atmosphere. Compare "make it move" with "slow dolly-in, shallow depth of field, soft golden light, gentle breeze in the hair." The second prompt tells the model what to do and what to leave alone. You are not just naming a subject; you are choreographing a few seconds of time.
It also helps to think in negatives. If a model keeps warping the background, say you want a static background with motion limited to the subject. Constraining motion is often more powerful than requesting it.
Best use cases for artificial intelligence image to video
This technology is not a novelty toy anymore. These are the places it earns its keep.
Social media content. Convert a single hero image into a scroll-stopping reel for Instagram, TikTok, or YouTube Shorts.
E-commerce. Animate product photos so an item subtly rotates or catches light, which can lift engagement on listings.
Marketing and ads. Turn a campaign key visual into a short motion ad without a video budget.
Portraits and avatars. Add lifelike micro-movements to headshots and profile images.
Real estate. Give listing photos a cinematic push-in that feels like a walkthrough.
Storytelling and art. Animate illustrations, concept art, or generated images to extend a creative project.
Limitations to know before you start
Being upfront here saves frustration. AI image to video is impressive, but it is not magic, and managing expectations is part of using it well.
Fine details can drift. Hands, teeth, text, and complex backgrounds are the hardest things to keep stable across frames.
Big motions get unpredictable. The more dramatic the movement you request, the more likely you'll see warping. Restraint pays off.
Clip length is limited. Most tools produce short clips by design. For longer sequences you stitch several together.
The source sets the ceiling. A weak image cannot be rescued by a good prompt. Garbage in, garbage out still applies.
None of these are dealbreakers. They are simply the reasons that thoughtful input and short, focused clips consistently beat ambitious one-shot attempts.
How image to video compares to traditional editing
People sometimes ask whether this replaces a video editor. It does not, it replaces the shoot, not the edit. A traditional pipeline captures real footage and then trims, color-grades, and arranges it. An AI image to video generator manufactures the footage itself from a single frame. The two pair well: generate motion clips from your best stills, then drop them into an editor to sequence, add sound, and finish. For many creators, the AI step removes the most expensive and time-consuming part of the process, which is getting usable footage in the first place.
What makes a good image to video flow?
A smooth image to video flow is one where you spend your energy on creative decisions, not troubleshooting. Look for a process that lets you upload, choose motion, preview, and export without juggling files between apps. The fewer steps between your photo and your finished clip, the more you'll actually use it, and the more you experiment, the faster your instinct for prompts and motion strength improves.
My rule of thumb: if a platform makes you guess at twenty sliders before your first render, it is slowing you down. If it gives sensible defaults and lets you refine afterward, it respects your time.
Tips for better results
Center your subject and leave a little breathing room so the model has space to add motion.
Favor calm, deliberate camera moves, a slow zoom reads as cinematic, a fast one reads as chaotic.
Match the mood in your prompt to the image; a moody portrait wants gentle motion, not a whirlwind.
Regenerate a few times. Outputs vary, and the second or third take is often the keeper.
Export at the highest resolution offered, then downscale for the platform you're posting to.
Choosing the right image to video generator
Not every tool fits every job, so it helps to know what to weigh before you commit your photos and your time to one platform.
Output quality. Look at sample clips, not just marketing. Watch how faces, edges, and backgrounds hold up across the full clip, especially in the final second where drift tends to appear.
Control. Can you set motion strength, choose a camera move, and guide the result with a prompt? More control means fewer wasted renders.
Speed. If a clip takes ten minutes, you'll experiment less. Faster generation encourages the trial-and-error that produces your best work.
Resolution and export. Higher output resolution gives you room to crop and repurpose the same clip for different platforms.
Workflow fit. The best tool is the one you'll keep using. A clean upload-to-export path beats a feature list you never touch.
Run the same source image through a tool's full process once and judge the result honestly. One real test tells you more than a dozen reviews.
Wrapping up
One more habit worth building: keep a small library of your best results and the prompts that produced them. Motion that worked on a portrait often works on the next portrait, and a prompt that nailed a product spin becomes a reusable recipe. Over a few weeks this personal cheat sheet does more for your output than any single feature.
The leap from a still photo to a moving clip used to require a studio. Now an image to video AI generator puts that capability in a browser tab, and the only real skill is learning to give it a strong image and a clear instruction. Start small, keep your motion subtle, and treat your first render as a draft. Do that, and you'll be turning your best photos into motion that earns attention rather than confusion.