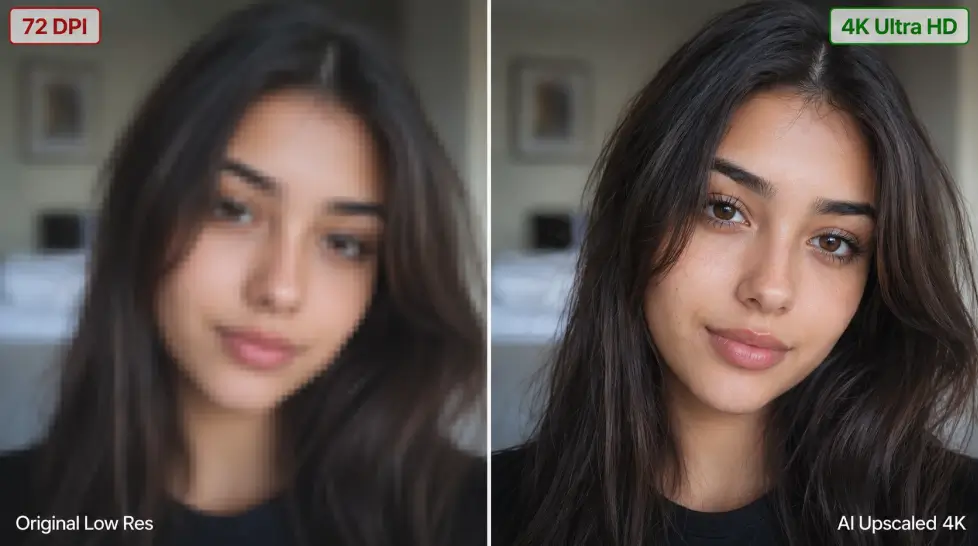
Blurry photo. Important moment. No way to reshoot it. Sound familiar?This is the exact problem AI upscaling was built for. And in 2026, the tools are actually good — not the 2019 kind of good where everything looked like a wax figure. I've been testing AI photo upscale tools for the better part of two years, and the gap between what's possible now and what was possible even 18 months ago is wide.So let's get into it. What AI upscaling actually does, when it works, when it doesn't, and how to use it to upscale image to 4K without your photo looking like a video game character.
What AI upscaling actually does
Here's the simple version: a regular upscale just stretches pixels. You go from 1000x1000 to 4000x4000 and the software fills in the new pixels by averaging the ones around them. The result? Blurry, soft, sad.AI upscaling does something different. The model has seen millions of images. So when you hand it a low-res photo, it predicts what the high-res version should look like. Eyelashes get defined. Brick textures get sharper. Fabric weave shows up where there used to be a smudge.It's not magic though. Let me be clear. The AI is guessing — educated guessing, but guessing. If your original photo has zero information in a region (say, a completely black shadow), no AI will conjure detail there. This deeper guide to image upscaling covers the technical side if you want to nerd out.
Best photo types for AI upscaling
Not every photo benefits equally. After running a few hundred test images through different tools, here's what works and what doesn't.Works great:
Old family photos and scanned prints
Phone photos that look fine on a screen but break down when zoomed
Screenshots and web images you want to print
Product shots taken under decent lighting
Headshots and portraits where the face is the focus
Works okay:
Low-light shots with some noise (the AI removes noise but can smooth too much)
Heavily compressed JPEGs from social media
Don't bother:
Severely motion-blurred photos (the subject is just gone)
Cropped sections smaller than 200x200 pixels with no real detail
Photos where the subject is out of focus and the background is sharp
One more thing. Old photos with damage — scratches, water spots, tears — those need restoration before upscaling, not at the same time. Otherwise the AI 'sharpens' the damage and makes it worse. Really.
How to upscale image to 4K — step by step
I'll walk through this using MagicShot's AI Image Upscale because that's what I use most often, but the steps are similar across most modern tools.Step 1: Pick the right source file. If you have a raw or PNG version, use that. JPEGs work but the compression artifacts get exaggerated by AI. Avoid screenshots of screenshots.Step 2: Clean before you upscale. If there are obvious blemishes, watermarks, or stray text, remove them first. The AI will sharpen anything it sees, including stuff you don't want.Step 3: Upload and pick your factor. Most tools offer 2x and 4x. For a 1080p photo, 2x gets you close to 4K. For 720p, you want 4x. Going higher than 4x rarely improves quality — it just makes the file bigger.Step 4: For portraits, run Face Enhancer first. This is the step most people skip. AI upscalers are general-purpose. They don't know that the smudge in the middle of your photo is supposed to be your grandmother's eye. Running a face enhancer first tells the system 'this is a face, treat it carefully.'Step 5: Download and check at 100%. Zoom in. Look for weird artifacts, melted backgrounds, or AI hallucinations (extra fingers, smeared text, that kind of thing). If something looks off, regenerate or try a different upscale factor.Step 6: Save as PNG if you're printing. JPEG compression undoes some of the work the AI just did. PNG is bigger but worth it for prints.
Image Upscale vs Pixel Perfect — which one do you want?
This trips people up. MagicShot has both, and they sound similar. They're not.
Feature | AI Image Upscale | Pixel Perfect |
|---|---|---|
Main job | Make image bigger and sharper | Recover detail at the existing size |
Best for | Printing, 4K displays, large screens | Fixing blurry photos that don't need to be bigger |
Output size | 2x or 4x larger | Same as input |
Speed | Slower — more pixels to generate | Faster |
Quick rule. If your photo is already big enough but soft, use Pixel Perfect. If you need more resolution for a print or a 4K screen, use Image Upscale. Sometimes I run Pixel Perfect first, then Upscale. The combination is honestly underrated.
Before and after — what to expect
Real talk about expectations. I'll show you what I've seen.Example 1: Phone photo from 2018. Original was 12MP but compressed by years of WhatsApp transfers. After 2x upscale plus face enhance, the photo went from 'okay for Instagram' to 'okay to print at 8x10.' Skin detail came back. Hair stopped looking like a watercolor.Example 2: Scanned print from 1987. The scan was 300 DPI but the original photo was soft to begin with. Result? Big improvement on the face (huge, actually). The background curtains stayed mushy because there was nothing to work with. That's the limit.Example 3: Compressed Instagram screenshot. Honestly? The result was usable but you could tell. The AI invented details that weren't quite right. Text in the background got rewritten into nonsense. For a thumbnail use, fine. For print, no.The pattern. Faces and human subjects upscale beautifully. Text, logos, and fine geometric patterns are where AI still struggles. Plan accordingly.
Tips for printing your upscaled photos
Upscaling is half the job. Printing is the other half, and most people screw this part up.
Check your DPI before sending to print. A 4K image is roughly 3840x2160. At 300 DPI, that prints at 12.8x7.2 inches max. Bigger than that and you'll see softness again.
Use sRGB color space for most consumer print shops. Adobe RGB looks great on screen but prints can come back oversaturated or washed out depending on the lab.
Soft proof if you can. Most editing software lets you preview how a print will look. Skin tones especially shift on paper.
Print a small test first. Never order a 24x36 canvas without printing a 5x7 test first. I learned this the expensive way.
Matte vs glossy matters. Glossy paper shows AI artifacts more clearly. Matte hides them. For upscaled photos, matte is forgiving.
One last thing on printing. If you're upscaling specifically for a giant canvas or poster, you don't need 300 DPI — you need 150 to 200 DPI because nobody looks at a 4-foot canvas from six inches away. Use that math to save processing time.
The honest limitation nobody mentions
AI upscalers, even the best ones, have a 'tell.' Look closely at upscaled photos and you'll sometimes see this slightly painted quality in textures — grass, fur, fabric. It's gotten 90% better in the last year, but it's not invisible yet.For everyday use, social posts, normal printing? You won't notice. For fine art prints or anything that gets scrutinized, the AI fingerprint is still there. Just so you know.That said. The alternative is throwing the photo away. So I'll take a slightly painted texture over a memory I can't display.If you want to go deeper into the broader workflow, the complete AI photo editing guide covers what to do before and after upscaling — restoration, color, enhancement, the full pipeline.
Start with one photo
Pick a photo you've been meaning to fix. Phone snap, old scan, whatever. Run it through an AI photo upscale tool. See what comes back.If you've never tried it, the jump from 2023 tools to 2026 tools will surprise you. And if you've tried before and were unimpressed — try again. The models have improved more in the last twelve months than in the three years before that.The photo isn't going to upscale itself.