How to Colorize Old Black and White Photos with AI
- How-to Guides
- 9 min read
- Published: May 31, 2026
- Harish Prajapat
That photo of your grandfather sitting on a porch in 1948? It’s been gray for so long you forgot he had red hair. Until your mom mentioned it last Thanksgiving and now you can’t unsee what’s missing.
Black and white photos hold a lot. But they also hide a lot. Colorization used to mean paying a retoucher $80 per image and waiting two weeks. Now you can colorize old photos with AI in under a minute, and the results are good enough that most people can’t tell.
This guide walks through how AI black and white photo colorize tools actually work, which photos give you the best results, the step-by-step process, and how to combine colorization with other restoration steps so the final image doesn’t just have color, it has life.
How AI colorization actually works
Short version: the model has seen millions of color photos paired with their grayscale versions. It learned that skin tends to fall in certain warm tones, grass behaves a certain way under sunlight, wood grain reads brown, sky reads blue (most of the time).
When you feed it a black and white image, it makes educated guesses pixel by pixel. Not perfect guesses. Plausible ones.
And that’s the thing people get wrong. AI photo colorization realistic results aren’t about the model knowing the truth. It’s about the model picking colors that feel right for the scene. A 1952 wedding photo gets warm cream tones because that’s what wedding photos from that era tend to look like in restored archives. A beach shot gets the ocean blue it deserves.
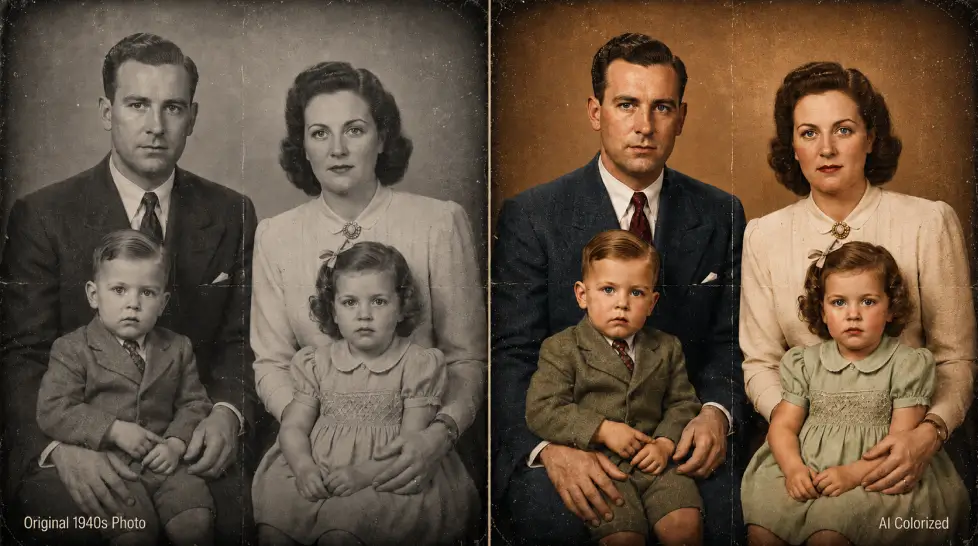
[IMAGE: Split-screen comparison showing a faded 1940s black and white family portrait on the left and the same image colorized in warm natural tones on the right, gentle vignette, archival feel]
Best types of old photos to colorize
Not every photo restores equally well. Here’s what tends to work and what tends to struggle.
Works really well
- Portraits with one or two clear subjects
- Outdoor scenes with sky, trees, grass
- Wedding and formal event photos
- Photos with good contrast and minimal damage
- Mid-century family snapshots (1940s through 1970s)
Works okay but needs help
- Group photos with many faces
- Indoor shots under tungsten light
- Heavily yellowed or sepia-toned prints
- Photos with selective focus or motion blur
Struggles
- Photos with heavy water damage or mold spots
- Tintypes and very early daguerreotypes
- Severely faded images where contrast is mostly gone
- Newspaper clippings (the halftone pattern confuses it)
If your photo is in the third category, you’ll need to do some prep work first. We’ll get to that.
Step-by-step: how to colorize black and white photos with AI free
Here’s the workflow that actually works, not the marketing version.
1. Scan or photograph the original
If you have a physical print, scan it at 600 DPI minimum. Phone photos work in a pinch but watch the angle. Tilted photos make the AI nervous and you’ll see weird color shifts along the edges.
Already digital? Skip to step two.
2. Clean the image first
This is the step most people skip. Big mistake. Scratches, dust, and creases get colored along with everything else. So a white scratch across your grandmother’s cheek becomes a pink scratch across your grandmother’s cheek. Not great.
Run the photo through a quick cleanup pass. A face enhancer can handle most of this for portraits, smoothing skin and recovering eye detail before the colorizer even sees the image.
3. Upload to the colorizer
Open the AI Image Colorizer, drop in your cleaned grayscale photo, and let it process. It usually takes 15 to 40 seconds depending on resolution.
4. Review and download
Look at the result on a real screen, not your phone. Check skin tones first. If faces look orange or weirdly pink, the lighting in the original threw the model off. Sometimes you can fix this by running it again with a slight contrast boost on the original.
Most of the time the first pass nails it. Really.
5. Upscale for the full restoration
Color alone isn’t a restoration. A colorized 800-pixel image is still an 800-pixel image. To actually print or share it, push the file through an upscaler.
Combine colorization with upscaling for full restoration
This is where one-step apps fail and a platform that does both pays off. A restored photo needs three things to feel finished: color, resolution, and detail recovery on faces.
Here’s the order that works:
- Clean the original (remove scratches, fix exposure)
- Run face enhancement if the photo has portraits
- Colorize
- Upscale to 2x or 4x
- Final color check
Do it in that order. Upscaling before colorization can amplify grain and noise that the colorizer then reads as texture and paints incorrectly. Colorize first. Then upscale the colorized result.
The difference between a colorized-only photo and a full restoration is huge. One looks like a filter applied to an old image. The other looks like a photo someone could have taken last weekend on a vintage camera.
Family history use cases that actually matter
The technical stuff matters. But honestly, the reason most people do this isn’t the tech.
Memorial slideshows
When someone passes, families pull out boxes of old photos and try to assemble something for the service. Colorizing the key images, just the ten or fifteen most important ones, turns a sad slideshow into something that feels closer to celebration. Faces become people again.
Genealogy projects
If you’re working on family trees through Ancestry or similar, colorized portraits make the project come alive for kids and grandkids who otherwise see history as flat gray squares.
Gifts that don’t feel like gifts
Pick a single black and white photo your parent or grandparent has on their shelf. Colorize it. Upscale it. Print it on real archival paper at 11×14. That’s a gift that hits differently than a gift card.
Wedding rehearsal galleries
Couples often want to include portraits of grandparents and great-grandparents at the rehearsal dinner. Black and white photos look austere next to modern wedding content. Colorized versions blend in and feel like part of the same story.
Restoring lost context
Sometimes a colorized photo reveals stuff you didn’t notice. A flag in the background, a particular flower in a vase, the actual color of a uniform. Color brings context that gray quietly erases.
Accuracy tips: making the result believable
The AI is good but not psychic. Here’s how to push it toward more accurate results.
Give it good contrast
Faded photos confuse the model. Before uploading, adjust levels so blacks are actually black and whites are actually white. Even basic phone photo editor tools can do this. The cleaner the contrast, the more confident the colorization.
Don’t expect exact color matches
The AI doesn’t know that the dress was teal or that the car was Hunter Green. If you know specific colors, plan to do a quick manual touch-up after. For unknown subjects, the AI’s guesses tend to land in period-appropriate ranges and that’s usually enough.
Watch out for skin tones
Skin is what people notice first. If a face comes out too orange or too pale, the issue is usually the original exposure. Try increasing brightness on the source by 10-15% and re-running.
Process portraits and landscapes separately when possible
If you have a photo that’s half portrait, half landscape, the AI sometimes overcorrects in one direction. If results look off, crop tighter on the subject and try again.
Use a platform with multiple tools in one place
Bouncing between five different sites kills momentum. Pick one that does colorization, enhancement, and upscaling under a single login. The full restoration workflow goes faster when everything lives in the same interface.
One real limitation worth knowing
AI colorization struggles with photos taken in unusual lighting. Late evening shots, candlelit interiors, shots with heavy backlighting. The model assumes natural daylight as a default. So a 1955 living room photo lit by table lamps might come out looking like it was shot at noon. You can correct this manually after, but it’s worth knowing before you start.
That’s the honest version. Not perfect. Pretty close.
Bringing it together
Restoring old photos with color isn’t about pretending the past was different. It’s about meeting it on terms that feel current. A great-grandfather in faded gray feels like a stranger. The same man with the actual color of his eyes and the actual color of his shirt feels like family.
That shift, gray to color, distant to present, takes about 90 seconds and costs less than a coffee. Worth doing for the photos that matter.
Frequently Asked Questions
Upload a scanned or photographed black and white image to the AI Image Colorizer, let it process for a few seconds, then download the colorized version. You can try it without paying upfront on MagicShot, and the free credits are usually enough to test a few family photos before deciding if you want more.
Yes, for most portraits and outdoor scenes the results look believable. Skin tones, sky, foliage, and wood are handled well. The AI guesses on things it can’t know for sure, like the exact color of a dress or a car, so don’t expect documentary accuracy on every detail. Treat it as a faithful interpretation, not a forensic recreation.
A good restoration usually needs more than colorization. Look for a platform that combines a colorizer with upscaling and face enhancement in one place, so you don’t have to bounce between five apps. MagicShot bundles all three under one subscription, which is why it works well for full restoration projects.
You can, but clean the image first. Heavy scratches and dust spots confuse the AI and end up colored too. Run the photo through a face enhancer or simple retouching pass before colorization for the best result.
Not always. The AI picks plausible colors based on patterns it has learned. If you know your grandmother’s dress was emerald green, you may need to tweak the result manually after colorization. For unknown subjects the AI’s guesses tend to feel period-appropriate.