How to Extend and Expand Photos Using AI Outpainting
- How-to Guides
- 8 min read
- Published: May 30, 2026
- Harish Prajapat
You took the shot. It’s perfect. Except your client wants it vertical, your editor wants it 16:9, and the print version needs three extra inches of sky. Cropping kills the composition. Re-shooting isn’t happening.
This is where outpainting earns its keep.
What outpainting actually is
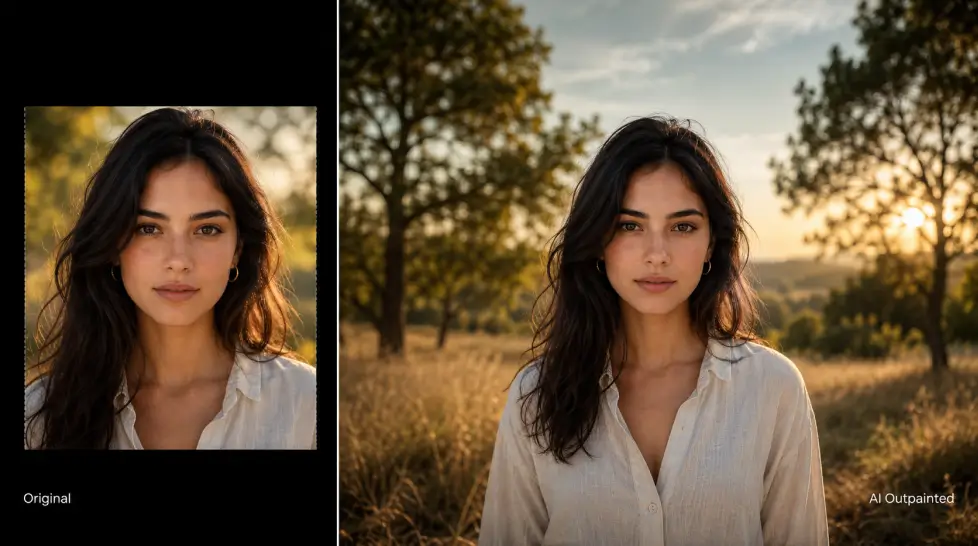
Outpainting is the opposite of inpainting. Inpainting removes or replaces stuff inside an image. Outpainting adds stuff outside the original frame. You feed the AI your photo, drag the canvas wider or taller, and it invents the missing pixels based on what it can see at the edges.
The model isn’t guessing blindly. It’s reading texture, lighting, perspective, color temperature, and the natural direction of every line in your photo. Then it continues those lines outward. A wall keeps going. A sky keeps stretching. A road extends into the distance.
Sounds like magic. It’s mostly math. Really impressive math.
And the reason it matters? Every platform you post to has a different shape. Your camera doesn’t care. Your audience does.
When you actually need to extend image AI tools
I used to think outpainting was a niche thing. A neat trick. Then I started counting how often I hit aspect ratio problems in a single week. Lost count around twelve.
Here’s where the ai outpainting tool earns a permanent spot in your workflow:
- You shot landscape, need vertical. Story format, Reels, TikTok, Pinterest. Your beautiful 3:2 photo becomes a sad cropped face.
- You shot vertical, need 16:9. YouTube thumbnails. Blog headers. Twitter cards. Everything wide.
- The subject is too tight to the edge. Maybe you didn’t have room to back up. Maybe you didn’t notice until you saw the file at home. Either way, you need breathing room now.
- Print sizing doesn’t match the original. A 4×6 photo file doesn’t drop neatly into an 8×10 print. You either crop the subject or you extend the canvas.
- You need matching banner sizes for a campaign. One photo, six placements. Each one a different shape.
Step-by-step: how to extend a photo with AI outpainting
Doesn’t matter which tool you’re using, the process is roughly the same. I’ll walk through it the way I do it on the Extend Image tool, but the logic transfers.
Step 1: Pick the right source photo
The best photos to extend are the ones with simple edges. Sky. Grass. A blurred background. A clean wall. If your subject is jammed against the border or there’s text running off the edge, the AI has less to work with.
Quick check: zoom into the edges of your photo. Can a human predict what’s just outside the frame? If yes, AI can too.
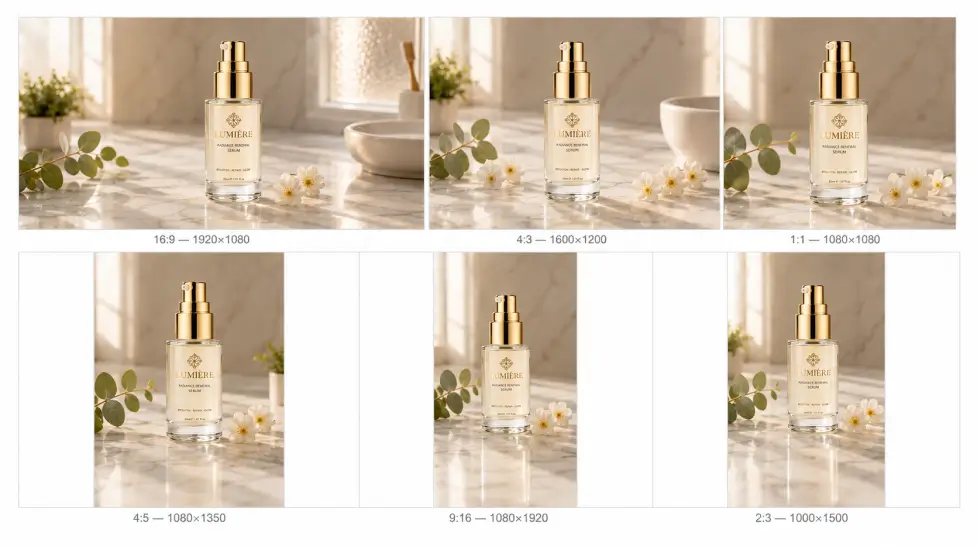
Step 2: Choose your target dimensions first
Don’t just guess. Decide upfront. Are you going to 9:16 for a story? 16:9 for YouTube? 1:1 for the feed? Set the target before you start dragging handles.
This matters because how much you extend in which direction changes the result. Going from 4:3 to 16:9 means adding to the sides. Going to 9:16 means adding to the top and bottom. Different problems.
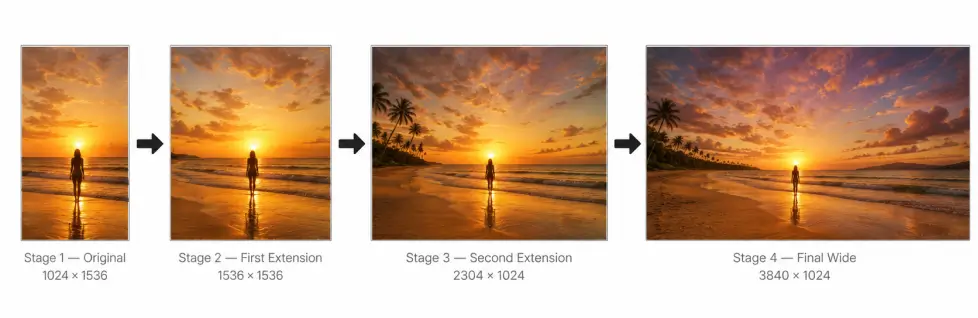
Step 3: Extend in stages, not in one giant pull
This is the tip nobody tells you. If you triple the width of your photo in a single pass, the AI has to invent way too much from limited reference. Quality drops. Weird artifacts show up.
Better way: extend 25-30% at a time. Let the AI generate. Use that new edge as the next reference. Keep going until you hit your target ratio.
Slower? Yeah. By maybe two minutes. Way better results.
Step 4: Add a prompt when you need direction
Most outpainting tools let you describe what should appear in the extended area. If you want a specific sky, more trees, an empty road continuing into the distance, type it. Don’t make the AI guess if you already have a vision.
If you’re happy with whatever logically continues from the edges, leave it blank. The model will infer.
Step 5: Review the seams
Look where old image meets new image. That seam is where problems hide. Color shifts. Texture changes. A line that doesn’t quite line up. If you see something off, regenerate. Or extend a little more in just that direction to push the seam outside the visible area.
Real use cases worth knowing
Theory’s fine. Here’s where it pays off.
YouTube thumbnails from vertical phone shots
You shot something on your phone. Vertical. Now you need a 16:9 thumbnail. Cropping cuts your face in half. Outpainting extends the background on both sides until you’ve got a wide frame with your subject still centered and intact.
For creators making short-form content and then repurposing for longer videos, this is honestly one of the most useful workflows. Pair it with the AI YouTube thumbnail workflow and you’ve cut your design time in half.
Instagram Story from a landscape photo
The opposite problem. Your gorgeous travel shot is 3:2 landscape. Story format is 9:16 vertical. Outpaint the sky upward and the foreground downward. Suddenly your beach photo has room for text overlay at the top and a clean walking path at the bottom.
Print at unusual sizes
You want a 24×36 wall print. Your photo is 12×18. Same ratio? Sometimes. Often not. Extend the canvas to match the print dimensions exactly and skip the awkward white borders or the brutal crop.
This is the use case I underestimated for a long time. Printers don’t care about your composition. They care about exact dimensions.
Banner ads at six different sizes
One source image. Leaderboards, square ads, skyscraper banners, mobile, half-page. Each platform needs different proportions. Outpainting lets you keep the hero image consistent across every placement without distorting the subject.
If you’re running ad campaigns, this saves you from either hiring six designers or accepting six awkward crops.
Reframing for cinematic feel
Sometimes you don’t need a new aspect ratio. You just want more space around your subject. A portrait with way more sky above feels more cinematic. A product shot with more table around it feels more editorial. Outpainting gives you that breathing room without re-shooting.
Quality tips that actually matter
I’ve made every mistake there is with outpainting. Here’s what I’ve learned the hard way.
Match your prompts to the photo’s mood. If your image is overcast and moody, don’t ask the AI to extend with bright sunny meadows. Reference the existing lighting, color palette, and atmosphere in your prompt.
Watch out for repeated patterns. Sometimes AI extends a pattern (bricks, tiles, fence posts) and gets stuck in a loop. The seam looks fine but the pattern goes on too perfectly. Add some variation in your prompt or break the symmetry manually.
Don’t extend faces or hands across the original border. If part of a person was cut off, outpainting struggles. Hands turn into mush. Faces grow weird features. Better to crop tighter or use a different photo.
Upscale after, not before. Extend your image first, then run it through an upscaler if you need more resolution. The other way around wastes processing time on areas you’re about to replace.
Save your originals. Always. Even if the extended version looks perfect. You’ll want to redo it in a different ratio next month and you’ll need the source.
Pairing outpainting with other AI tools
Outpainting rarely works alone in a real workflow. You usually combine it with a few other steps.
- Background removal first. If you only want to extend the background and keep the subject sharp, isolate the subject with background removal, extend the background separately, and recombine.
- Upscaling after. Stretch the canvas, then sharpen the result.
- Edit details with image editing. If the AI invents something you don’t love in the extended area, use general AI image editing to swap it out.
For folks new to all this, the beginner’s guide to AI images is worth reading first. Outpainting makes way more sense once you understand what these models can and can’t infer.
Where outpainting falls short
Honest moment. It’s not perfect.
Complex scenes with lots of small important details? Outpainting gets confused. A crowd of people. A bookshelf packed with specific spines. A cityscape with iconic buildings. The AI will invent plausible-looking nonsense.
Anything with text. The AI will generate gibberish letters that look like text but mean nothing. Crop those out, don’t extend them.
Recognizable brands or logos at the edge. The model won’t reproduce trademarked stuff accurately. And honestly, you don’t want it to.
For everything else? It’s the fastest way to fix aspect ratio problems that’s ever existed.
Just try it
Pick a photo you’ve been frustrated with. Maybe one you cropped awkwardly. Maybe one that didn’t fit somewhere you wanted to post it. Open the extend image AI tool, drag the canvas to the size you need, and see what happens.
Worst case you waste five minutes. Best case you’ve just unlocked every photo in your library for every platform you post to.
That’s a pretty good trade.
Frequently Asked Questions
AI outpainting is the process of extending an image beyond its original borders. The AI looks at what’s already in the photo, predicts what would logically continue outside the frame, and fills it in. So a tight portrait becomes a wide landscape. A square crop becomes a vertical story. The original pixels stay untouched.
Upscaling makes the same image bigger by adding pixel density. Outpainting makes the image wider, taller, or both by adding new content the AI invents based on context. Two different jobs. You often use them together.
Almost any image works, but results depend on what’s at the edges. Clean skies, repeating patterns, and clear backgrounds extend beautifully. Complex scenes with cut-off faces or text at the border are harder. Start with photos that have breathing room near the edges.
Any ratio you need. 16:9 for YouTube, 9:16 for Reels and TikTok, 1:1 for Instagram feed, 4:5 for portrait posts, 3:2 for print. You can also go custom if you’ve got a billboard or banner with weird dimensions.
Usually no, especially with backgrounds and skies. With detailed scenes it can sometimes invent stuff that doesn’t match perfectly. The fix is to extend in smaller increments instead of doubling the canvas in one go. More control, better blends.