How to Virtually Try On Outfits Before Buying with AI Fashion Try-On
- How-to Guides
- 9 min read
- Published: June 1, 2026
- Harish Prajapat
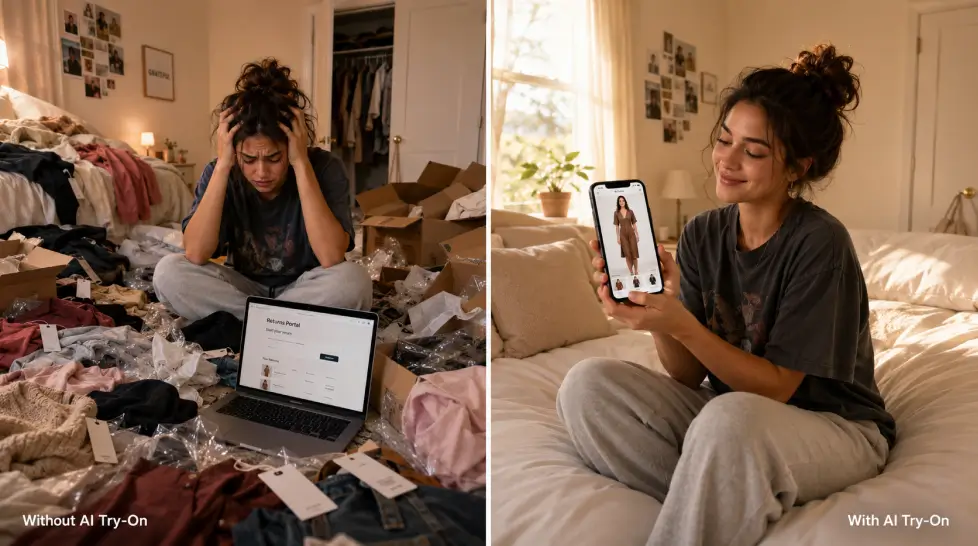
Online shopping has one unfixable problem. You can’t see how the clothes look on you.
You order, you wait, you try it on at home, you return half of it. That cycle costs retailers billions and costs you hours. Virtual clothing try-on AI is the workaround, and it’s gotten genuinely good in the last year. Not perfect. Good.
I’ve been testing these tools for months on my own photos, on product shots from Zara and SSENSE, on the kind of outfits I’d never actually buy without seeing first. Here’s what works, what doesn’t, and how to use it without wasting your time.
The problem with buying clothes online
Around 30% of online clothing purchases get returned. Thirty percent. The number one reason? Fit and look. People order something that looked great on a 6-foot model with a 24-inch waist, then it shows up and doesn’t sit right on a real body in real light.
Returns sound free. They’re not. You’re paying in shipping labels, packaging, time, and the slow drag of decision fatigue. And retailers pass the cost back through prices anyway.
The other issue. Trends move fast. You see a jacket on TikTok at noon, it’s sold out by 8 pm, and you’re left wondering if it would’ve even worked on you. By the time you find out, the moment’s gone.
Physical fitting rooms solve some of this. But who actually goes to malls anymore? I went last month and three stores I needed were closed.
How AI virtual try-on works
The short version. You give the AI two photos: one of you, one of the garment. The model identifies your body shape, pose, skin tone, and the existing outfit you’re wearing. Then it strips out your current clothes (digitally, calm down) and overlays the new garment, adjusting for how the fabric would actually drape, fold, and catch light on your specific frame.
It’s doing a few things at once:
- Pose estimation. Where your arms, shoulders, and hips are.
- Body segmentation. Separating you from the background and from your current clothes.
- Garment warping. Bending the flat product photo to follow your body’s contours.
- Texture preservation. Keeping the original fabric pattern, color, and stitching intact so it still looks like the same shirt.
- Lighting match. Adjusting shadows so the new outfit looks like it was photographed in your photo’s lighting.
The last one is what separates the bad tools from the actually-useful ones. Early try-on apps slapped garments onto bodies like paper dolls. Lighting was off. Edges looked cut out. You could tell instantly.
The newer models, like the one powering Fashion Try-On on MagicShot, blend the garment into your photo’s existing light direction. Shadows fall where they should. The fabric reads as part of the image, not pasted on top.
Step-by-step: how to virtually try on clothes with AI
Here’s the actual workflow. I’ll use MagicShot since that’s what I’ve tested most, but the principle is the same across decent tools.
Step 1: Pick the right source photo
This matters more than people think. Your photo should be:
- Well-lit, ideally natural light from the front or side
- Full body or at least mid-thigh up, depending on what you’re trying on
- Plain background if possible (a wall, not a busy living room)
- Your body facing roughly forward, no extreme angles
- Wearing fitted clothes, not a giant hoodie
That last point trips people up. If you’re swimming in an oversized sweater, the AI has nothing to read your shape from. Tight or fitted source clothing gives a much better result.
Step 2: Get a clean garment photo
Use the product image straight from the store’s website. Flat lays work. So do ghost-mannequin shots (those headless ones where the garment looks like it’s on an invisible body). Avoid photos of the garment being worn by a model in a complicated pose. The AI does better with a clear, isolated view of the clothing.
Step 3: Upload both
On Fashion Try-On, you drop in your photo, then the outfit photo. Hit generate. It takes about 30 to 60 seconds.
Step 4: Review and iterate
First result might be 80% there. Maybe the neckline isn’t quite right or a sleeve sits weird. Run it again. AI generations have variance. Two attempts usually gives you one really good output.
Step 5: Save and decide
Download the image. Compare it side by side with your original photo. Honest gut check: do you actually like it on you? If yes, buy with confidence. If no, you just saved yourself a return shipment.
Try on designer pieces without dropping the cash
This is where AI try-on gets fun. You can see yourself in a Margiela coat, a Bottega bag, a vintage Helmut Lang piece you found on Grailed for $1,800. No risk, no awkward boutique visits.
I tested this recently with a piece I’d been eyeing for weeks. Saw the result, realized the silhouette didn’t actually work on my frame, walked away. Saved myself the price of a flight to nowhere.
If you’re into this kind of thing, there’s a deeper walkthrough on trying designer outfits on your photo using AI that goes into specific brand examples and styling tricks.
The same approach works for:
- Wedding outfits before alterations
- Job interview looks
- Vacation wardrobes before packing
- Vintage pieces that can’t be returned
- Cosplay and character outfits
- Custom or commissioned pieces
Tips for content creators using AI fashion try-on
If you’re making fashion content, the math here is wild. A model shoot used to mean booking a photographer, renting a studio, ordering sample garments, then editing for hours. Now you can produce a full lookbook in an afternoon from your couch.
A few things I’ve learned from creators using these tools at scale:
Build a base photo library
Take 10 to 15 great photos of yourself in different poses, lighting setups, and locations. These become your reusable base layer. Every new outfit drops onto an existing photo, so you stop needing new shoots for new content.
Mix try-on with full AI model shots
For when you need totally new scenes (different city, different season), the AI Model Shoot feature generates fresh photos of you in different settings. Combine that with try-on, and you’ve got infinite content variations. There’s a breakdown of how influencers use AI model shoots to build consistent feeds if you want the specifics.
Test outfits before you buy them for PR
If brands send you stuff, you can preview how it’ll look on you before you say yes. Saves brands money on returns, saves you closet space on things you’ll never wear again.
Pair try-on with hair changes
Sometimes an outfit needs a new hair vibe to really land. Try the AI Hair Style tool on the same photo to test out a chop or color before booking anything. Full makeover preview in 10 minutes.
Caption it honestly
If you’re posting AI try-on content, say so. Audiences are sharp. They can tell when something’s AI-generated, and the trust hit from pretending it isn’t is worse than just being upfront. “Tested this AI on the new XYZ collection” performs better than trying to pass it off as a real photo.
Limitations. Because nothing is perfect.
Let’s be real about what doesn’t work yet.
| What works well | What still struggles |
|---|---|
| T-shirts, blouses, button-ups | Sequins, heavy beading, fur |
| Jeans, trousers, fitted skirts | Very sheer or layered fabrics |
| Jackets, blazers, coats | Shoes (results are inconsistent) |
| Simple dresses | Complex draped gowns |
| Solid colors and basic patterns | Intricate lace or embroidery details |
| Studio product photos as input | Garments shot on a busy model in motion |
A few other honest gripes. Tattoos sometimes get partially erased if they sit where the new garment overlaps. Hands holding accessories can get weird. And if the original photo has someone else next to you, the AI occasionally tries to dress them too. Crop them out first.
One more thing. The tool isn’t replacing your eyes on real fabric. You still want to feel cashmere before dropping $400. AI gives you a strong visual preview. Texture and weight, you confirm in person.
The bigger picture
Five years ago, you’d be laughed out of a meeting for suggesting people could try on clothes from their phone without leaving the house. Now it’s just a tool. Free to try, takes a minute, works on most outfits.
Online shopping returns will drop. Boutiques will use it at the door. Stylists will use it during consultations. Resale platforms will let buyers try before they bid. It’s already starting.
If you’ve never tried it, take five minutes today. Pick one outfit you’ve been thinking about. Run it through. See what happens.
The closet you save might be your own.
Frequently Asked Questions
Yes, if the photo is decent. You need a clear, well-lit shot where your full body or torso is visible, no weird angles, and your current outfit isn’t too baggy. Tight or fitted clothing in the source photo gives the AI a better read on your shape, so the new outfit drapes more accurately.
Upload a photo of yourself, then upload a photo of the outfit you want to try (a product image from a store works fine). The AI maps the garment onto your body, matching your pose and proportions. You get the result in under a minute.
Yes. Since you’re uploading the actual garment photo, the AI doesn’t care if it’s a $20 tee or a $2,000 Balenciaga jacket. It treats every input the same. That’s why people use it to test designer pieces before committing.
Highly textured fabrics like sequins, fur, or intricate lace can lose detail. Very loose or draped pieces sometimes shift oddly around the hips. And shoes are hit or miss. For standard tops, dresses, jackets, and jeans, results are surprisingly close to real.