How to Remove Watermarks and Text from Photos with AI
- How-to Guides
- 8 min read
- Published: June 5, 2026
- Harish Prajapat
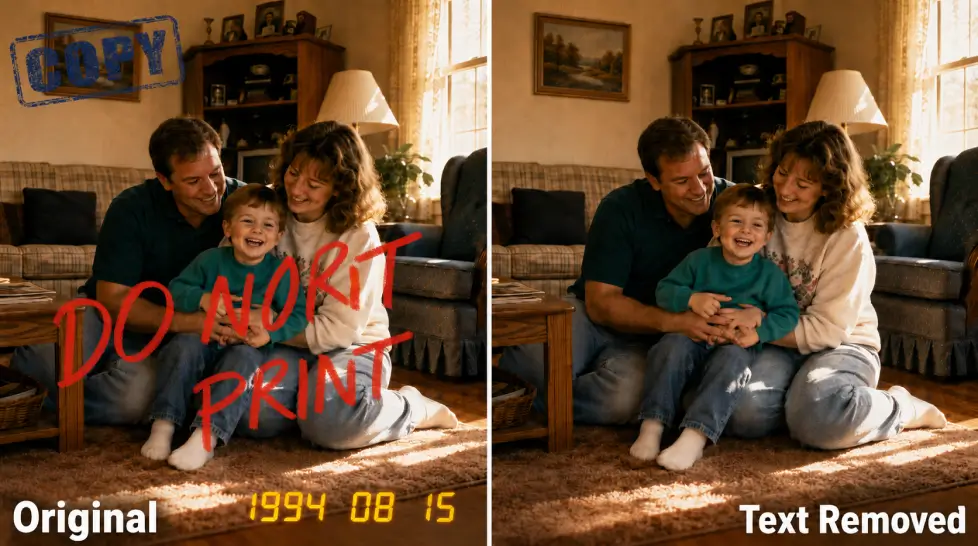
Watermarks ruin photos. Date stamps, store logos, that random caption someone burned into a JPG five years ago. You shouldn’t need Photoshop and three hours to fix that.
And honestly? You don’t.
AI text removal handles this in seconds now. Brush over the unwanted text, hit generate, done. The AI rebuilds whatever was underneath based on the surrounding pixels — sky, wall, grass, skin, whatever. When it works, it works incredibly well. When it doesn’t, well, we’ll get to that part too.
This guide walks through the whole thing. When to use it, how the inpainting actually works under the hood, the step-by-step process, and the limitations that nobody tells you about until you’ve wasted twenty credits on the same stubborn image.
When You Actually Need AI Text Removal
Not every photo edit calls for this. Sometimes a crop fixes the problem faster. But here’s where AI text removal really earns its keep:
- Watermarks on your own photos — you bought the stock image, you have the rights, but the preview still has the diagonal logo across it
- Date stamps from old digital cameras — that yellow 06/14/2008 burned into the corner of every family photo
- Store logos on product shots — you sourced the image, but the retailer’s branding is plastered across it
- Captions baked into screenshots — old memes, recipe photos, anything where the text is part of the JPG itself
- Graffiti or signage in travel photos where you want clean backgrounds
- Subtitles burned into video stills when you’re pulling frames for a thumbnail
The legal part matters here. Don’t remove watermarks from images you don’t own. That’s not a feature, that’s just theft with extra steps. Use this on your stuff, photos you’ve licensed properly, or images you have explicit permission to edit.
How AI Inpainting Actually Fills the Gap
Quick technical detour. You don’t need this to use the tool. But it helps when something fails and you’re trying to figure out why.
Traditional removal tools — clone stamp, healing brush, all that — copy pixels from one part of the image to another. They’re dumb. They don’t know what they’re copying. You’re the brain.
AI inpainting is different. The model looks at the entire image, understands what’s in it (sky, brick wall, human face, table edge), and then generates new pixels that match the context. Not copies. Generates. Brand new pixels that didn’t exist before.
So if you have text over a brick wall, the AI doesn’t just copy nearby bricks. It understands “brick wall” as a concept and creates a believable continuation. Same with skies, grass, water, skin. The model has seen millions of examples and knows what these textures look like.
This is why it works so well on natural backgrounds and gets weirder on complex stuff. The AI is essentially guessing. Educated guessing, but guessing.
If you want to go deeper on how these models actually work, there’s a solid breakdown in this beginner’s guide to AI image generation.
Step-by-Step: Removing Text and Watermarks
Okay, the actual process. I’m using MagicShot’s AI Text Removal here because it’s what I know works, but the steps translate to most decent tools.
Step 1: Upload Your Image
Drop the photo in. JPG, PNG, WebP — all standard formats work. Higher resolution gives the AI more to work with, so don’t downscale before uploading if you can help it.
One thing worth knowing: if your watermark covers like 60% of the image, you’re not removing it, you’re regenerating most of the photo. Manage expectations.
Step 2: Generate and Compare
Hit the button. Wait 15 to 30 seconds. You usually get one result, sometimes a few variations depending on the tool.
Now zoom in. Like, really zoom in. The first glance always looks fine. It’s at 200% where you spot the weird artifacts — a smudged texture, a repeated pattern, a tiny ghost of the original text.
If something’s off, you have options. Re-brush a slightly different area. Try again with a tighter selection. Or move to the alternative method below.
Step 3: Download in Full Resolution
Most tools export at the original resolution. If you need to push it further — print, large display, whatever — run it through an upscaler afterward. Don’t upscale first and then remove text, the artifacts compound.
The Limitations Nobody Mentions
Time for the honest part. AI text removal isn’t magic. Here’s where it falls apart:
Text Over Faces
If the watermark crosses someone’s face, you’re going to have a bad time. The AI will try to reconstruct the face based on what it can see. Sometimes it nails it. Often the result looks slightly off — wrong eye position, weird skin texture, that uncanny vibe.
For this case, you’re better off using AI Image Editing with a written prompt describing what should be there. More control, better results on subjects.
Complex Patterns and Fine Detail
Intricate fabric, detailed jewelry, text on text — these tend to get smudged. The AI smooths over what it can’t confidently reconstruct.
Repeating Patterns
If your watermark sits on a repeating pattern (tile floor, brick wall, fence), the AI sometimes generates a slightly off-rhythm continuation. You can see the seam if you look hard enough.
Very Large Watermarks
Full-image diagonal watermarks (the classic stock photo move) are the hardest. The AI has less context to work from. Results vary wildly.
Very Small Text
Sounds counterintuitive but tiny text near image edges sometimes gets missed entirely. The brush doesn’t always register on detail that small. Zoom in before brushing.
Quick Comparison: When to Use What
| Scenario | Best Tool | Why |
|---|---|---|
| Date stamps on old photos | AI Text Removal | One-click fix, plain backgrounds |
| Watermarks on landscapes | AI Text Removal | Natural backgrounds reconstruct cleanly |
| Text across a person’s face | AI Image Editing | Prompt-based control over reconstruction |
| Logo on a product photo | AI Text Removal first, then AI Image Editing if needed | Most product backgrounds are simple |
| Subtitles on video stills | AI Text Removal | Solid color bars are easiest cases |
| Multiple watermarks layered | AI Image Editing | Need iterative prompted edits |
The Alternative: AI Image Editing for Stubborn Cases
When pure inpainting fails, switch tactics. Instead of telling the AI “remove this area,” you describe what should be there.
Say you have a photo with text across a wooden table. AI Text Removal might smudge the wood grain. AI Image Editing lets you prompt: “clean wooden table surface, oak grain, natural lighting.” The AI now has direction. It’s not guessing, it’s executing.
This works especially well for:
- Replacing text-covered areas with specific content
- Restoring details the inpainting model couldn’t infer
- Combining removal with other edits (color shifts, style changes, object swaps)
Think of it as the manual transmission version of the tool. More work, more control.
Tips That Actually Improve Results
Stuff I’ve picked up that nobody puts in tutorials:
- Brush in multiple passes. If one big selection fails, try removing the text in two or three smaller sections. The AI handles smaller jobs more consistently.
- Work at original resolution. Don’t preview at 50% and assume it’s fine. Zoom to 100% minimum before deciding.
- Try variations. Most tools generate one result by default, but you can usually re-run for a different attempt. The AI isn’t deterministic.
- Crop first when possible. If the watermark is in a corner, sometimes cropping it out is faster and cleaner than removing it.
- Combine with face enhancement. If you removed text near a face and the area looks slightly off, run it through a face enhancer afterward to clean up details.

What About Free Tools?
People ask this constantly. Are there free options for removing watermarks?
Yes, some. Quality varies wildly. Most free tools either watermark your output (ironic), limit you to low resolution, or use older inpainting models that smudge more.
MagicShot offers free trials so you can test the AI text removal on real images before paying for anything. That’s usually enough to know whether it’ll work for your use case. If you’re doing one or two edits, free trials cover it. If you’re processing dozens of images, a subscription pays for itself fast — you get access to image editing, background removal, upscaling, and 50+ other tools under one plan.
Wrapping Up
AI text removal isn’t perfect. But for 80% of watermark and text removal jobs, it’s faster than anything else available. Brush, generate, download.
The trick is knowing when to switch tools. Simple backgrounds? Pure inpainting. Complex subjects or faces? Move to prompted editing. Multiple stacked problems? Iterate.
Now go fix that photo your aunt sent with the date stamp on it.
Frequently Asked Questions
Not on flat or textured backgrounds. The AI rebuilds pixels based on surrounding context, so the result looks native. Quality issues only show up when the watermark sits over a complex subject like a face or detailed product.
Only on photos you own or have rights to. Removing watermarks from licensed stock photos or someone else’s copyrighted work is illegal. Use this for your own images, scanned documents, or photos you’re properly licensed to edit.
MagicShot’s AI Text Removal handles most cases in one click. For complex backgrounds where text sits over faces or fine detail, switching to AI Image Editing with a written prompt usually gets better results.
About 15 to 30 seconds per image. Upload, brush, generate. The processing itself is fast — most of your time goes into selecting the area you want removed.