How to Use the MagicShot Headshot Generator: Step-by-Step Tutorial
- Tutorial
- 9 min read
- Published: May 5, 2026
- Harish Prajapat
Studio headshots cost too much. And they take a whole afternoon. So when someone tells you to update your LinkedIn photo for a job hunt or a conference bio, the whole thing feels like a chore you keep pushing to next week.
That’s basically why I started messing with the MagicShot Headshot Generator tool in the first place. Curious. A little skeptical. Mostly just tired of looking at the same selfie I’ve been using since 2022.
This is the full tutorial. What to upload, which settings actually matter, where it stumbles, and the small tricks that change the output more than you’d expect.
What you need before you start
Not much, honestly. You need a MagicShot account and one decent selfie. That’s the whole list.
But the selfie matters more than people think. Here’s what works:
- Front-facing, looking at the camera
- Shoulders visible, not just your face
- Soft, even light (window light is perfect)
- No sunglasses, no hats, no heavy filters
- Plain background if possible
And what doesn’t work? Group shots where you crop yourself out. Old photos with weird compression. Anything with a strong color cast (like that orange tint you get from cheap restaurant lighting). The AI can technically work with messy inputs. The results just won’t be as good.
One more thing. Your face should be the clear focus. If the photo is mostly your hoodie and a bit of forehead, the model has less to work with. Pretty obvious in hindsight, but I wasted a few generations learning that.
Step 1: Upload your selfie
Open the headshot generator page and you’ll see a big upload zone. Drag the photo in or click to browse. JPG and PNG both work.
The system runs a quick check on the face. If it can’t detect a clear face or the resolution is too low, you’ll get a warning. Don’t ignore that. I tried to push through once with a slightly blurry shot and the final headshots had this weird waxy skin thing going on.
If you have multiple selfies, upload your best one. Not the one where you think you look coolest. The one with the clearest face details. Those are different photos, trust me.
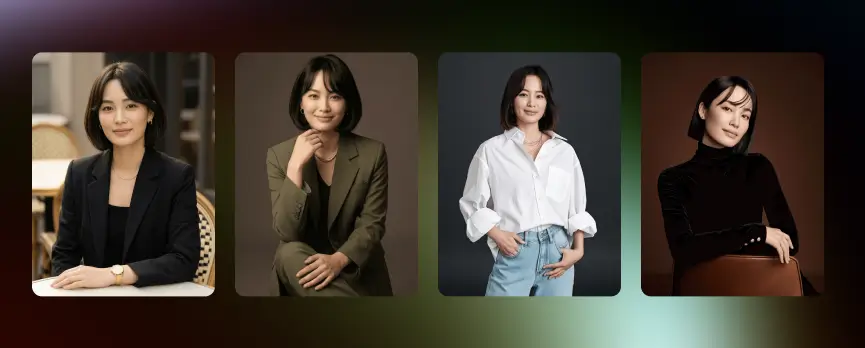
Step 2: Choose a style from the 50+ options
This is where it gets fun. And a little overwhelming.
The styles are grouped roughly by category. Corporate. Creative. Casual. Outdoor. Editorial. Within each group there are variations: navy suit on a gray studio backdrop, white shirt against a soft blue, black turtleneck with dramatic side lighting, the works.
How do you pick? Match the style to where you’ll use the headshot.
| Where you’ll use it | Style to pick |
|---|---|
| LinkedIn, corporate bio | Classic Corporate, Navy Suit, Studio Gray |
| Startup About page | Casual Professional, Soft Outdoor, Smart Casual |
| Author or speaker site | Editorial, Dramatic Lighting, Black & White |
| Creative portfolio | Artistic, Color Pop, Studio with Color Wash |
| Conference badge or press | Studio White, Clean Headshot, Soft Light |
You can pick more than one. I usually pick three so I have variety in the final output and I’m not committed to a single look. Costs a tiny bit more credit. Worth it.
Step 3: Generate and review
Hit generate. Wait about 60 to 90 seconds. The first batch shows up.
Now the actually important part. Don’t pick your favorite immediately.
Look through every variation. Zoom in. Check the eyes. Check the teeth if you’re smiling. Check that ear that’s barely visible behind your hair (AI sometimes gets weird with ears, just trust me on this one). Skin texture should look like real skin, not airbrushed plastic.
You’ll usually find one of three things:
- A clear winner you love
- A few decent ones that need a small fix
- None of them feel right
If it’s option three, the input photo was probably the issue. Re-shoot the selfie with better light and try again. If it’s option two, save them and run them through enhancement tools. If it’s option one, congratulations, that took less time than ordering takeout.
The honest limitation
Sometimes the AI gets glasses wrong. The frame shape shifts slightly between variations or the lens reflections look off. It’s better than it used to be but if you wear glasses, generate extra variations and pick carefully. Same goes for unique facial features like a specific scar or a distinctive piercing. The model averages, and averaging loses small details.
Also, very curly or textured hair sometimes comes out looking smoother than reality. Worth flagging because it’s the kind of thing you only notice when you compare to your actual reflection.
Step 4: Download and use
Found your winner? Download it in the highest resolution available. The headshots come out crisp enough for print, web, and zoom backgrounds without needing to upscale.
If you do need to upscale (say, you’re putting your face on a billboard, congrats), the AI image upscale tool handles that cleanly. But for normal use cases, the default resolution is more than enough.
Where to use it:
- LinkedIn profile and cover
- Company About page
- Email signature
- Speaker bios and conference badges
- Resume header
- Press kit and media features
- Slack and Teams avatars
One tip. Don’t use the same headshot for everything. Pick two or three different styles and rotate them across platforms. Your dating app photo should not be your LinkedIn photo. Your LinkedIn photo should not be your podcast cover. Different platforms, different vibes, but you can get all of them from one MagicShot session.
For a deeper take on turning a single photo into platform-specific shots, the guide on turning a simple photo into a professional headshot is worth a read.
Pro tips that change the output more than the settings
After running this thing dozens of times, here’s what actually moves the needle:
Wear what you’d wear in real life. If your day job is software engineering at a hoodie-friendly company, a navy suit headshot looks like a stock photo of someone else. The clothing in your input photo bleeds into the output even when you pick a different style.
Generate in batches across different styles. One corporate, one casual, one creative. You’ll be surprised which one you actually like once you see them all side by side.
Don’t smile if you don’t usually smile in photos. Forced smiles look forced even after AI processing. A relaxed neutral expression usually outperforms a stiff grin.
Re-run if the lighting feels off. Each generation has slight variation. If the first batch has weird shadows, just regenerate. Costs almost nothing.
Use it for headshot variety. Speakers and consultants often need three or four different professional photos for different contexts. One MagicShot session covers the whole need. The piece on generating headshots in minutes instead of booking photoshoots walks through the math on why this matters for working professionals.
MagicShot headshot review: the honest take
Is it perfect? No. Glasses sometimes warp. Curly hair smooths out. Very specific accessories don’t always survive the generation cleanly.
But for the actual job most people need, which is one solid LinkedIn photo and a couple of variations for other platforms, it does the work. Faster than a photographer. Cheaper than a photographer. And you can redo it in five minutes if your hair gets a major change next month.
The 50+ styles are the real value. You’re not picking between three corporate looks. You’re picking between dozens of distinct, well-lit options that would each have been a separate setup at a real studio.
Try it. Generate a couple of styles. Pick the one that looks like you on a good day, not someone you wish you were. That’s the headshot people actually click on.
Your selfie is fine. The result might surprise you.
Frequently Asked Questions
Most styles finish in around 60 to 90 seconds per batch. If you generate multiple variations or pick a heavier style, expect closer to two minutes. It’s fast enough that you can iterate three or four times in a single sitting.
A clear, front-facing photo with even lighting and your full face visible from the shoulders up. Avoid sunglasses, hats, heavy filters, or group shots. A plain wall behind you also helps the AI lock onto your features.
Yes. The output is high resolution and meant for professional use, including LinkedIn, About pages, press kits, conference bios, and resumes. The corporate styles in particular are built for that purpose.
MagicShot processes your selfies for generation and you control the outputs from your account. Don’t upload photos of other people without their permission, and review the privacy details on policy page if you have specific concerns.
For most professionals who just need a clean LinkedIn or website photo, yes. A studio session costs $200 to $500 and takes a half day. The AI version costs a fraction of that and gives you 50+ style options in one go. For executive branding shoots, a photographer still wins.