How to Turn a Simple Selfie Into a Professional LinkedIn Headshot with AI
- How-to Guides
- 9 min read
- Published: April 28, 2026
- Harish Prajapat
A bad LinkedIn photo costs you opportunities. Recruiters spend roughly 6 seconds on a profile before deciding to keep scrolling, and the photo is the first thing their eyes land on. So if your current shot is a cropped wedding picture from 2019? You’re losing before you start.
Here’s the thing: most people know they need a better headshot. They just don’t want to pay $300 for a studio session, take a half day off work, and hope the photographer captures something usable. That’s where a LinkedIn headshot AI tool changes the math.
I’ve tested this. Multiple times. With my own selfies, with photos from coworkers, with stuff that probably shouldn’t have worked. The results aren’t always perfect (more on that later), but the good ones genuinely look like studio photography. And the whole process takes under 10 minutes.
What LinkedIn actually looks for in a profile photo
Before you generate anything, know what makes a profile photo work on LinkedIn. It’s not what you think.
It’s not about being conventionally attractive. It’s not about wearing a suit. It’s about three specific things:
- Your face fills the frame. Head and shoulders. Not a full body shot. Not a tiny face in the corner of a beach photo.
- Your eyes are visible and looking at the camera. Sunglasses kill engagement. So do photos where you’re looking off into the distance like you’re contemplating quarterly earnings.
- The background isn’t fighting you. Soft, neutral, or a clean office setting. Anything else competes for attention.
LinkedIn’s own data backs this up. Profiles with photos that follow these rules get around 14 times more views than profiles without a photo, and significantly more than profiles with weak photos.
Step-by-step: from selfie to download
Here’s the actual process. No fluff.
Step 1: Pick your input photos
Most AI headshot tools want 5 to 15 photos of your face. Some need only one. Either way, the quality of your input directly determines the quality of your output. Garbage in, garbage out — same rule as always.
Use recent photos. Different angles. Good lighting. Don’t use heavily filtered Instagram shots because the AI will lock onto the filter and try to recreate it.
Step 2: Upload to your AI tool of choice
For this walkthrough I’m using MagicShot’s headshot generator. Drag your photos in. The interface accepts all type of image formats.
Step 3: Choose your style
This is where most people get it wrong. They pick the most dramatic option — moody lighting, edgy expression, that kind of thing. Don’t. For LinkedIn, pick the most boring professional option available. Boring is good. Boring builds trust.
Look for: neutral office, soft natural light, business casual or business formal depending on your industry.
Step 4: Generate
Click. Wait. The AI processing takes about 30 to 40 seconds for most tools.
Step 5: Review and download
Now the part nobody talks about. You have to actually look at each result and check that it still looks like you. Sometimes AI subtly changes your jawline. Or makes your eyes a slightly different shape. Reject those. Keep only the ones where someone who knows you would say yeah, that’s them.

Best background styles for LinkedIn
Background choice matters more than people realize. It signals industry, level, and personal style without you having to write a single word in your bio.
| Background Style | Best For | Avoid If |
|---|---|---|
| Soft gray or beige studio | Finance, law, consulting, executive roles | You’re in a creative field that values personality |
| Blurred modern office | Tech, startups, marketing, sales | Your industry expects more formality |
| Outdoor natural light | Real estate, wellness, freelance creatives | You’re applying to traditional corporate roles |
| Pure white or off-white | Healthcare, science, research, academia | You want warmth or personality |
| Bookshelf or library | Education, writing, publishing, legal | Looks staged in tech or modern fields |
If you’re switching industries or unsure what fits, default to the soft gray studio. It works almost everywhere. Boring, but effective.
Want more control over the background separately? You can pair the headshot with the AI background remover to swap settings later if your industry shifts.
Tips for the best input selfie
The single biggest factor in your result quality. By far. I cannot stress this enough.
Here’s what works:
- Natural light from a window. Stand facing it. Don’t have it behind you.
- Plain wall or simple background. The AI handles the new background. Your input shouldn’t compete.
- Neutral expression with a slight smile. Full toothy grins sometimes confuse the AI’s face mapping.
- Look directly at the camera. Eye contact in the input means eye contact in the output.
- Recent photos only. Don’t mix photos from 5 years ago with current ones. The AI averages your features across inputs and you’ll end up looking like nobody specifically.
- Variety in angle, but not extreme. Slight left, slight right, straight on. Skip the dramatic over-the-shoulder shots.
What kills results: heavy makeup that’s different from your daily look, hats, sunglasses, photos with other people in them where the AI gets confused about which face matters, and selfies taken from below your chin (the dreaded double-chin angle that makes everyone look weird).
One more thing. If your face is partially blurry or low-resolution in the input, run it through a face enhancer first. Sharper input, sharper output. Simple as that.
Before and after: what real results look like
Let me be honest about what AI headshots can and can’t do.
What they nail: lighting, background, professional polish, outfit consistency, that subtle studio-quality skin tone that real photographers spend hours editing for. The output often looks better than what most photographers under $200 would deliver.
What they sometimes miss: hands (skip hand-in-frame poses), unusual jewelry, specific tattoos, distinctive scars, very recent hairstyle changes. The AI works from patterns, and patterns don’t always include your specific quirks.
I had one round where the AI gave me a slightly stronger jawline than I actually have. Looked great. But not me. Tossed it. The next round was perfect.
Actually, scratch that — not perfect. There’s no perfect. But it was the best LinkedIn photo I’d ever had, and it took 8 minutes total.
For a deeper walkthrough of the upload-to-final process, this guide on turning a simple photo into a professional headshot covers each step in detail.
How to choose the best AI tool for LinkedIn headshot generation
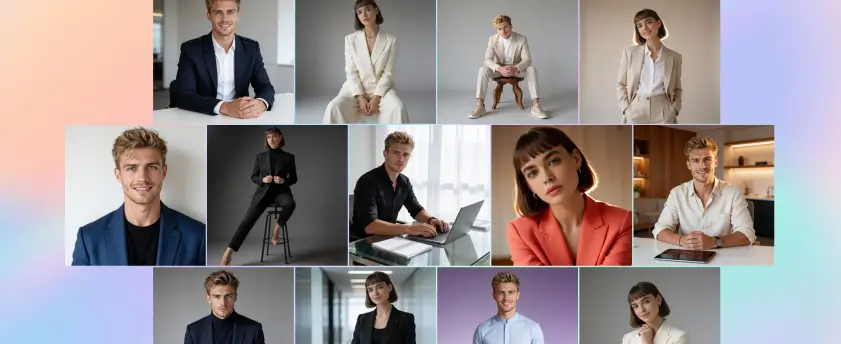
Not all AI headshot tools are equal. Some give you that obvious AI-generated plastic look. Others produce photos that pass for actual studio work.
What to check before you commit:
- Sample gallery quality. Look at their public examples. If the eyes look slightly off or the skin looks airbrushed to the point of melting, skip them.
- Number of variations per generation. You want at least 20 to 40 outputs to choose from. Anything less and you’re rolling the dice.
- Background and outfit options. Pre-made styles save time but customization helps if you have specific needs.
- Pricing structure. Watch for tools that charge per photo. Subscription models with unlimited generations usually work out cheaper if you want options.
- Privacy policy. Your face data matters. Read what they do with your uploads.
For a more detailed comparison, the breakdown of top AI headshot generators covers what’s currently performing well.
[IMAGE: Professional AI-generated LinkedIn headshot of a person in business casual attire against a softly blurred modern office background, warm natural lighting]
Common mistakes that ruin AI LinkedIn headshots
I see these constantly. Don’t do them.
Mistake 1: Picking the most dramatic style. LinkedIn isn’t a modeling portfolio. Save the moody black-and-white for your personal Instagram.
Mistake 2: Using outdated input photos. If you’ve gained or lost weight, changed hair, or aged noticeably, your AI photo will look like someone you used to be. Recruiters meet you in interviews. The disconnect is awkward.
Mistake 3: Generating once and giving up. First generations are often the worst. Run a few rounds. Adjust your input photos. Try different style presets. The good ones take a couple attempts.
Mistake 4: Ignoring the small stuff. Crooked tie. Weird collar. Unnatural skin texture in one specific spot. Zoom in before you download.
Mistake 5: Using the same photo across every platform. A LinkedIn photo and a dating app photo serve different purposes. Don’t conflate them.
Refreshing your photo every year matters more than you think
One thing nobody mentions. Your LinkedIn photo shouldn’t be 5 years old. People age. Styles change. The cultural read of “professional” shifts.
The cheap, fast nature of AI headshots means you can update yearly without it being a project. New photo, new background, new energy. Takes 10 minutes. Costs almost nothing if you’re already on a subscription.
Compare that to scheduling a photographer, doing the shoot, waiting two weeks for edits, paying $400. The economics aren’t close.
So. Fresh selfie this weekend. AI tool of your choice. New LinkedIn photo by Monday morning. That’s the workflow now.
Your old photo isn’t doing you any favors. Replace it.
Frequently Asked Questions
Yes. LinkedIn doesn’t ban AI-generated profile photos. What matters is that the photo actually looks like you. Recruiters care about recognition, not the camera that took the shot. As long as the AI version reflects your real face, you’re fine.
A traditional studio session runs $150 to $500 in most US cities. An AI headshot subscription starts around $9 and gives you dozens of variations across different backgrounds and outfits. The cost difference is significant, especially if you want to refresh your photo every year.
From uploading a selfie to downloading a finished headshot, expect 30 to 40 seconds. The rest is choosing a style and reviewing options.
Many AI headshot tools offer a free trial or a few free generations. MagicShot lets you test the headshot generator before committing to a plan. For a full set of polished results, a paid plan typically gives better quality and more variety.
The best tool depends on what you need. If you want studio-style realism with control over background and outfit, look for one that uses recent models like Nano Banana 2. MagicShot’s headshot generator handles this well and pairs with face enhancement and background removal in the same platform.